Installing Active Directory on Windows Server 2008 R2 Enterprise
Preparation for Active Directory
Installing Active Directory Domain Services on a Rackspace Cloud Server is a relatively easy process. There are a few requirements that must be present first to ensure a smooth installation however.
1. Have your domain name selected along with the Domain Administrator Password that you wish to use.
· Note- Though it is not a requirement, It is recommended you use a multiple name format for you domain name. Example would be, domainName.com or domainName.local rather than simply domainName.
2. A properly configured and available DNS server. This can be installed locally on the DC, and will be the case with this installation scenario.
· W2K8 can properly install and configure DNS during the AD installation if it knows that DNS is to be local.
· This is accomplished by having the Private network adapter’s Preferred DNS server address point to the already assigned IP address of the same Private network adapter.
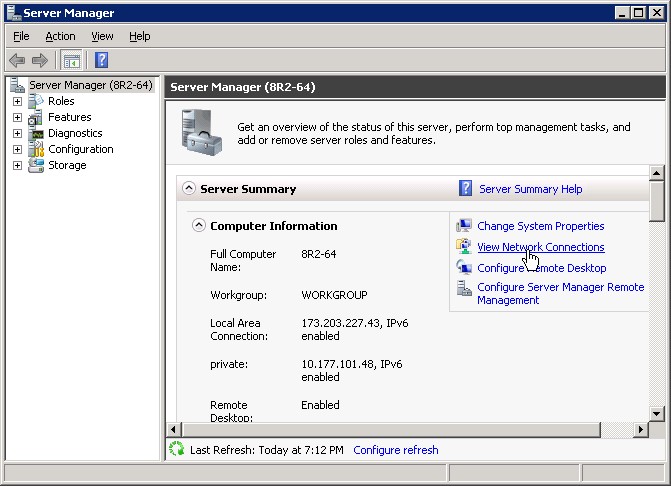
To do this, select View Network Connections within the Server Summary of Server Manager.
Right click on the Private adapter and select Properties. Or Double click the Private adapter and select Properties.
Double click Internet Protocal Version 4, or select it and click Properties.
Now copy your assigned IP address: displayed in the top box into the Preferred DNS server: box and click “OK”.
-
- Now click OK again for the private Properties and close the Network Connection window.
3. The last step for prepping W2K8 for AD is adding the proper Server Role.
-
- New to W2K8 is the ability to configure the server to perform specific roles.. The “Active Directory Domain Services” Role will be added. This only installs the framework for W2K8 to become a DC and run AD. It does not promote the server to DC or install AD.
- To add the “Active Directory Domain Services” Role click on the Role Directory within Server Manager and select Add Roles in the Roles Summary.
Click Next at the “Before You Begin” section.Now simply check mark Active Directory Domain Services and click “Next” twice, “Install” and finally “Close” when complete.
Installation of Active Directory Domain Services (DCPROMO)
Now that the Server has been prepared the installation of AD we can proceed. You now have three different ways we can begin the installation.
- 1. Within Server Manager, if you expand the Roles directory you will see the Active Directory Domain Services directory. Select that and you will find in the Summary “Run the Active Directory Domain Services Installation Wizard (dcpromo.exe)” Simply click that to begin the installation.
- 2. The comandline equivilant to Active Directory Domain Services Installation Wizard is - Servermanagercmd.exe –I ADDS-Domain-Controller
- 3. The last and probably the most recognized method is typing DCPROMO.exe at the command prompt.
Whichever way you choose, You should get to this point. Simply click Next. You do not check advanced mode.
Click on Next Button
Now select “Create a new domain in a new forest” and click Next.
Now enter the domain name you have chosen.
After the installation verifies that the NetBIOS Name, you will choose the Forest function level. I chose 2008 R2. After selecting click Next.
It will examine and verify you DNS setting. DNS server should already be checked. Now click Next.
You will now be prompted with the following message. This is OK. Just click Yes.
Click Next Again.
Now enter your Domain Administrator Password that you chose. This is not your Admin Password that emailed to you during the creation of you Server, unless you want to use it. It is your decision.
Click Next.
The installation will now complete. You can check the reboot on completion if you like.
If not, you will need to click Finish here. Then restart your server.
- After a few minutes, reconnect to your server via the Console in your Control Panel or RDP.
- To log in, you will need to select “Switch User”, then Other User. Type in your full domain name you picked followed by a back slash and Administrator for user. Then enter the password that was emailed to you when you first built the server. If you had already changed your password for the local admin account to this server before your began the install for AD, use that password.
!!!Congratulations!!! You have installed an Active Directory Domain Controller.
Reference Link
Installing Active Directory on Windows Server 2008 R2 Enterprise 64-bit

.jpg)
.jpg)
.jpg)
.jpg)
.jpg)
.jpg)
.jpg)
.jpg)
.jpg)
.jpg)
.jpg)
.jpg)
.jpg)
.jpg)
.jpg)
.jpg)
.jpg)
.jpg)
.jpg)
.jpg)
.jpg)
.jpg)